
From Artwork to Thread: The Art of Tailored Digitized Embroidery Patterns
Introduction
There is something magical about seeing a flat, lifeless digital image transform into a vibrant, textured embroidery design. That moment when the needle starts moving and your artwork begins to take physical form on fabric is what keeps embroiderers coming back to their machines, project after project. But getting from a simple sketch or logo to a beautifully stitched design is not as simple as pressing a button. It requires a careful, artistic process known as digitizing, and the quality of that process makes all the difference in your final results. Tailored Digitized Embroidery Patterns are the backbone of any successful embroidery project, and understanding how they come to life will elevate your work from amateur to professional.
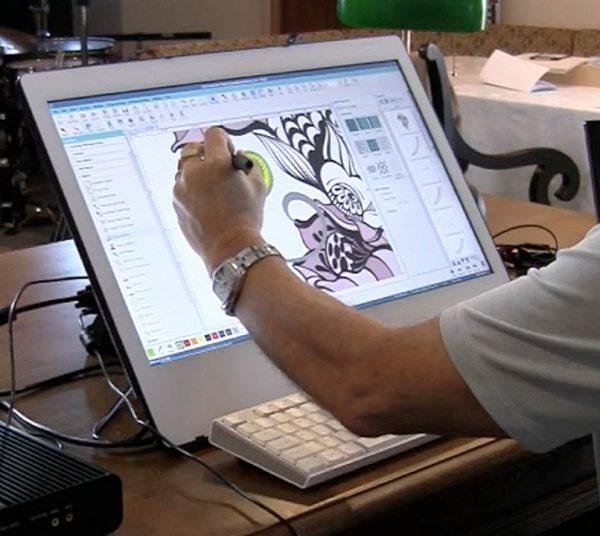
When we talk about digitizing in the embroidery world, we are really talking about translation. Your embroidery machine speaks a specific language of stitches, directions, and densities. Your artwork, whether it is a detailed illustration, a company logo, or a simple piece of text, speaks a completely different language of colors, shapes, and shading. The digitizer acts as the interpreter, converting every curve and color into a series of stitch commands that your machine can understand and execute. This is not a straightforward, mechanical process. It is an art form that requires technical knowledge, artistic judgment, and a deep understanding of how thread behaves on fabric.
The difference between a poorly digitized design and a well-digitized one is night and day. A bad design will pucker, gap, or distort, leaving you frustrated with wasted thread and ruined fabric. A good design, however, will stitch out smoothly, lie flat, and capture every detail of the original artwork with stunning accuracy. It will have the right underlayment to stabilize the fabric, the correct density to cover the area without being too stiff, and the proper pull compensation to prevent the design from shrinking as it stitches.
In this guide, we are going to explore the fascinating journey from artwork to thread. We will break down the digitizing process, explain the different stitch types and when to use them, and share practical tips for getting the best results from your embroidery machine. Whether you are sending designs to a professional digitizer or learning to digitize yourself, understanding this art form will give you a huge advantage. Let us dive into the world of tailored digitized embroidery patterns and discover how great designs are made.
The Foundation of Great Embroidery
Before you can even think about digitizing, you need to start with good artwork. The quality of your source image directly impacts the quality of your finished embroidery. If your artwork is pixelated, blurry, or poorly contrasted, the digitizer will have to make guesses about shapes and details, and those guesses rarely lead to great results. For the best outcome, your artwork should be clean, high-resolution, and clearly defined.
Vector files are the gold standard for embroidery digitizing. Programs like Adobe Illustrator create vector images that scale infinitely without losing quality, and they provide clear, sharp outlines that are easy for digitizers to follow. If you are working with a raster image like a JPEG or PNG, try to start with the highest resolution possible. At minimum, you want at least 300 DPI to ensure that the digitizer can see all the details they need to recreate.
Color separation is another crucial consideration. Embroidery thread comes in a limited range of solid colors, unlike digital art which can display millions of colors and gradients. Your design will need to be simplified into solid blocks of color that can be stitched with thread. If your artwork has complex gradients or shading, the digitizer will need to use techniques like tatami fills or patterns to simulate those effects. Understanding these limitations from the start will help you set realistic expectations and create artwork that translates beautifully to thread.
Understanding Stitch Types and Their Uses
Every embroidery design is made up of different types of stitches, and a skilled digitizer knows exactly when to use each one. The three most common stitch types are satin stitches, fill stitches, and running stitches, and each serves a distinct purpose in bringing your design to life.
Satin stitches are those beautiful, dense, zigzag stitches that you see on lettering and narrow borders. They create a smooth, shiny surface that catches the light and adds a premium feel to any design. Satin stitches work best for elements that are relatively narrow, typically up to about half an inch wide. If you try to use satin stitches on a wider area, the design will become too dense, leading to thread breakage and fabric puckering. For larger areas, you switch to fill stitches.
Fill stitches, also known as tatami stitches, are used to cover broader areas of a design. These stitches run back and forth in a patterned way, filling the space without the same density as a satin stitch. The angle of the fill, known as the stitch angle, is carefully chosen to enhance the design and prevent distortion. A good digitizer will change the fill angle in different areas of the design to add depth and texture, making the finished piece look more dynamic and less flat.
Running stitches are the simplest type, consisting of a single line of stitching. They are perfect for outlines, fine details, and small text that would be too delicate for satin stitches. Running stitches add definition and can make a design pop by providing clear boundaries between different elements. The key to great digitizing is knowing how to blend these stitch types together seamlessly to create a cohesive, professional-looking design.
The Critical Role of Underlayment
One of the most overlooked aspects of embroidery digitizing is underlayment. Underlayment is the foundation stitching that goes down before the top stitches, and it serves several critical functions. First, it stabilizes the fabric, preventing it from shifting or puckering during the main stitching. Second, it provides a base for the top stitches to sit on, helping them look fuller and more even. Third, it can help secure tricky fabrics like knits or stretchy materials.
There are different types of underlayment, each suited to different fabrics and designs. Edge run underlay follows the outline of the design and is great for preventing distortion in satin stitches. Zigzag underlay provides a grid-like base that works well for fill areas. Center run underlay runs down the middle of narrow elements and is commonly used for lettering. A skilled digitizer will choose the appropriate underlayment for each part of the design, ensuring that the top stitches have the support they need to look their best.
Skipping underlayment or using the wrong type can lead to all kinds of problems. You might see the fabric puckering, the design shrinking, or the stitches sinking into the material and losing their definition. Investing in proper underlayment might add a few minutes to the stitching time, but the improvement in quality is more than worth it.
Pull Compensation and Design Integrity
When thread pulls through fabric, it exerts force on the material, causing it to shift slightly. This phenomenon is known as pull, and it can cause your design to distort if not accounted for. Tall, narrow lettering might appear to pinch together. Circular designs might look more like ovals. Pull compensation is the digitizer's tool for counteracting this natural tendency.
The concept is simple, if thread pulls fabric inward, the digitizer will expand the design slightly so that after the pull occurs, the final result matches the intended size and shape. This compensation is not guesswork. Experienced digitizers know how different fabrics behave and adjust their designs accordingly. A design that looks perfect on a sturdy canvas might need significant pull compensation when stitched on a stretchy knit. This is one of the many reasons why working with an experienced digitizer or developing your own expertise is so valuable.
Density and Thread Management
Stitch density refers to how close together the stitches are in a fill area. A higher density means more stitches per square inch, which creates a fuller, richer look but also increases the risk of thread breakage and fabric damage. A lower density stitches faster and is gentler on the fabric but might leave gaps that let the fabric show through. Finding the right density is a balancing act.
Dense designs are particularly challenging. When you pack a lot of stitches into a small area, the needle has to punch through layers of thread and fabric with each pass. The friction generates heat that can weaken the thread and the needle. If you are working with a dense design, you might need to slow down your machine speed, use a larger needle, or even reduce the density slightly to achieve a smooth result.
Modern digitizing software makes it easy to adjust density, and many digitizers will customize the density based on the fabric you plan to use. A design that will be stitched on a heavy twill might need less density than one intended for a lightweight linen. Discussing these details with your digitizer or experimenting with test stitches will help you dial in the perfect settings.
Lettering and Small Details
Digitizing text presents its own unique challenges. The smaller the text, the more carefully it needs to be digitized. Fine lines and tight curves can easily become distorted or illegible if the stitches are too large or the density is too high. For small text, you typically want to use a satin stitch with a narrow width. The height of the text should be at least a quarter of an inch to remain readable, and using a clean, sans-serif font usually produces the best results.
When digitizing text, the digitizer also needs to think about the direction of the stitches. Stitching letters at the wrong angle can cause them to look uneven or distorted. For example, the curves in a letter like "S" require careful planning to ensure that the stitches flow smoothly and the letter retains its shape. Experienced digitizers often use a technique called slanting, where they adjust the stitch angle to follow the natural flow of the letter, making the finished text look crisp and professional.
Choosing Between Professional and DIY Digitizing
With the rise of affordable digitizing software, many embroiderers are tempted to digitize their own designs. While this is certainly possible, it is important to understand the learning curve involved. Professional digitizers spend years honing their craft, learning how different fabrics behave, how to optimize designs for different machines, and how to troubleshoot problems. Their expertise comes at a cost, but it often saves you time, frustration, and wasted materials in the long run.
If you are new to embroidery, starting with professionally digitized designs is usually the smarter choice. You can focus on learning your machine and perfecting your techniques without fighting against poorly digitized patterns. As you gain experience, you might want to explore digitizing software and start creating your own simple designs. Just remember that digitizing is a skill like any other, and it takes time and practice to master.
Conclusion
The journey from artwork to embroidered thread is a fascinating blend of art and technology. Tailored digitized embroidery patterns are the bridge between your creative vision and the mechanical reality of your embroidery machine. When done well, digitizing transforms your ideas into stunning, tactile works of art that capture every nuance of the original design.
Whether you choose to work with a professional digitizer or learn the craft yourself, understanding the principles behind good digitizing will make you a more confident and capable embroiderer. You will know what to look for in a design, how to communicate your needs to a digitizer, and how to troubleshoot issues when they arise. And you will have a much deeper appreciation for the skill and artistry that goes into every stitch.
The next time you load a design into your machine and watch it come to life on fabric, take a moment to appreciate all the thought and care that went into creating those tailored digitized embroidery patterns. From the choice of stitch types to the placement of underlayment to the careful balance of density and pull compensation, every detail was chosen to give you the best possible result. And that is the true art of embroidery digitizing.

 English
 Arabic
 French
 Spanish
 Portuguese
 Deutsch
 Turkish
 Dutch
Dutch
 Russian
 Romaian
 Portuguese (Brazil)
 Greek
Greek